
Home sausage making was once a common and practical way of using up pork trimmings. Making sausage was never given a second thought; it was something that every family did naturally.
As our culture moved away from an agricultural society to a manufacturing society we delegated our sausage making to others and forgot how to make sausage at home. Many cooks of today have never made their own sausage and really don’t even know how to start.
Making your own sausage is easy and does not have to involve spending hundreds of dollars on fancy equipment. You can spend $40 on a nice meat grinder and $40 on a stuffer and you are ready to rock and roll.
Once you get the hang of things you might want to upgrade to bigger equipment but for the batch sizes we will be working with there really is no need to spend over $100.
Homemade sausage is incredibly delicious and can be custom tailored to meet your individual taste.
One of the great things about making your own sausage is that you are in complete control of what goes in. Commercial sausages can be up to 50% fat and push the salt limits as hard as possible.
There will be no “mystery meat” or floor scrapings in your sausage. You will be using hand trimmed meat, freshly ground herbs and spices and just as much fat, salt and nitrite as you want.
You will be crafting high quality edible art.

I will walk you through the basics of how to make sausage. We will start with choosing the meat and end with resources to learn more advanced techniques.
The sausages I am showing you can be made in less than three hours. There are several stopping points along the way if you need to turn this into a two day project.
A constant theme throughout this post is the need for high quality; both in ingredients and in your attention to cleanliness. Sausage making is incredibly simple but because of its simplicity any shortcuts you take will be  immediately obvious.
I was incredibly intimidated by the thought of making my own sausage. It seemed like such a specialized skill and technique that it would be completely impractical for me to even begin to learn.
Malarkey!
This stuff is easy and actually fun. Keep reading and you will see what I mean.
Meat Preparation
All of the sausages in this book use pork butt (Boston butt) as the primary meat. You want your sausage to have a fat content between fifteen and thirty percent and this is pretty close to what is present in an average pork butt.
Another reason butts are so handy is that they usually weigh about five pounds which is the perfect size for making a manageable batch of sausage.
Butts are typically packaged with the meat side up. When you take the butt out of the package flip it over and make sure there is still plenty of fat left on the bottom.
The pictures below show a butt that is ideal for making sausage.


There are times when you will need to supplement your butt with some extra fat. Maybe the meat cutter was too aggressive in trimming, maybe the butt came from an extra lean hog or maybe you bought the whole shoulder instead of just the butt.
Most grocery stores (but not mega-marts) will have a supply of pork fat for sale. Quite often it is in the freezers but sometimes you will need to inquire with the meat cutter. The most you ought to ever need is a pound and usually a half pound will be plenty.
Pork loins can also be used to make sausage. I mention this because they will often be on sale for a dollar a pound. There is some fat on a pork loin but not enough to be significant. For every pound of pork loin I will add a quarter pound of pork fat.
Start by getting things clean; really clean. Take your idea of clean and then make it cleaner. Use hot soapy water and clean your knives, cutting boards and hands. When you wash your hands make sure you clean under your nails.
You will be using a meat grinder and stuffer later on so now is the time to clean them as well.
It is not required, but an excellent idea, to sanitize as well. Add a tablespoon of bleach to a gallon of cold water, mix well and pour this over everything that will come into contact with your meat.
Allow everything to air dry. If you get into the habit of sanitizing now then it will be second nature if you decide to take things to the next level and start making air dried cured sausages. Dry cured sausages are beyond the scope of this course but I will provide a list of resources for you to explore later on.
Once everything is clean we can start working on the meat. The end product we want is rough cubes of meat approximately one to two inches in size. If you are working with a bone-in butt you will need to get that bone out of there.
Don’t worry about doing a pretty job, all this stuff is going to end up going through the grinder so your boning technique isn’t important.
Slice the butt into four or five steaks about an inch thick. At this point you will notice three distinct regions in the butt; the meat, the fat and what I call the slime.
The “slime” is the membrane type stuff that’s hanging out between the different muscles that make up the butt. I cut out as much of the slime as possible. I think it looks ugly and is not something I want to have in my sausage. This stuff does not have the same texture as the good fat and can sometimes get twisted around the shaft of your meat grinder or jam up your cutting blade.
I don’t get too obsessed about the stuff; I just cut it out as I see it and move on. Don’t confuse the slime with the fat; fat is good and needs to be kept.


After the meat has been cleaned up go ahead and finish cutting the pork into the rough cubes. Put all of the cubed meat into a clean bowl and mix your seasoning into the meat. Don’t worry about an exact recipe at this point; we will get to those later.
Here it what it will look like at this point:

What you will have to do is decide if you want to grind and stuff your sausage today or if you want to finish things up tomorrow. Regardless of which you choose it is time to get the meat COLD again.
Yep, it is in bold because this step is important.
During the time that you have been cutting and trimming the pork it has gotten warm from sitting out on the counter and from the heat of your hands. A critical aspect of making sausage is achieving a good emulsion between the protein and the fat. If the fat is warm it will separate from the protein instead of forming an emulsion; this is termed smearing.
If the fat smears the effect is non-reversible. Go ahead and make a pot of chili with your pork because sausage will not be happening.
If you want to finish making your sausage today then put the meat in the freezer for about thirty minutes. If you want to finish up tomorrow then go ahead and stick in the refrigerator. Either way; get the meat cold again before you even start to think about grinding.
Grinding the Meat
At this point you are going to need a meat grinder. I use the food grinder attachment on my KitchenAid stand mixer.
Your meat grinder probably has two or more grinder plates. For the sausages we are making you will want to use the grinder plate with the smallest holes. If you are using a metal grinder it would be ideal if you placed it in the freezer for thirty minutes. A cold grinder will help the meat stay cool while you are working. If this is impractical for you then don’t worry about it.
Assemble your grinder according to the manufacturer’s instructions. Make sure you pay attention to how the cutting blade is inserted. On some grinders the cutting blade will “fit” even if it is placed in backwards. If you start grinding with your blade backwards you will have a miserable experience.
This is an easy mistake to make; I have done this twice.
Take the seasoned meat out of the freezer and run it through your grinder as quickly as possible. The meat will be extruded into worm-like strands as it passes through the grinder plate.
You will notice that I am grinding into the mixing bowl of my stand mixer. I have the metal bowl sitting in an ice bath to keep the meat cool after grinding. You should be able to grind through five pounds of meat in a little over five minutes.


Just to drive the point home: I am grinding cold meat with a cold grinder into a cold bowl and I am doing it quickly.
Mixing the Meat
Now that the meat is ground you are going to add some liquid and turn the mixture into a paste. By making a paste we are going to make sure that the seasonings are well distributed, the meat is well lubricated and that the texture of the final sausage is smooth.
For a five pound batch of sausage we are going to add up to a cup of ice cold liquid. We then mix the liquid into the meat for one to two minutes until a paste starts to form.
This is pretty easy using my set up as all I have to do is put the bowl back onto my stand mixer and use the paddle attachment (setting 4). If you aren’t using a stand mixer then break out a sturdy spoon and get to work.

I don’t really recommend using your hands to mix the meat and form the paste. Most folks never get their hands really clean enough and your hands add a lot of heat to something we are trying to keep cold.
The paste forms as the salt denatures the protein fibers in the meat and causes them to relax. The relaxed proteins will then bind to each other and form the paste. Paste formation is important as this determines the texture of the sausage. If you cooked the meat right after grinding it would still be delicious but it would have a grainy texture. (If you prefer a sausage with a coarse texture then you would add the liquid prior to grinding and skip this step.)
Don’t go overboard on making the paste. If you think you are done you probably are. Over mixing the paste can break the emulsion between the meat and the fat resulting in a horrible sausage.
Take a small portion of your seasoned meat paste and form a patty and place the remainder of the meat back in the freezer to cool off. Fry the test patty in a pan with just a little bit of oil and try it out. Need more salt, pepper, garlic, or paprika? No problem, mix some more seasoning into the meat paste and resample.
Once your seasoning is adjusted to your liking and your meat has gone back into the freezer it is time to start prepping you casings for stuffing.
Using Casings
Traditional sausage casings are made from the cleaned intestines of sheep, pigs and cows. Sheep casings have the smallest diameter and are used for products like breakfast link sausage. Beef casings are by far the largest and are used for most air dried cured sausages like salami. The sausages in this book will be made with pork casings which are the traditional size for bratwurst, Italian sausage, etc.
There are two other types of casings available: collagen and fibrous. Both of these casings are manufactured products and as their names imply are either made from beef collagen or from plant fibers. We will not have a need for fibrous casings in this post but might be interested in using the collagen casings.
The hardest part about using natural casings is finding them in the first place. Go ahead and ask at the meat counter of your supermarket if they carry them; sometimes they get stored in odd locations where you would never consider looking.
Hog casings are sold in small packages and typically contain enough casing to make fifteen to twenty pounds of sausage. The casings are packed in salt to keep them from spoiling.

When you are ready to use the casings you will need to unravel them from each other. Typically there are six or seven stands of casing that have inter-twined during storage.
Place the casings in a bowl of warm water for about thirty minutes to let the salt soak out of them along with any funky smells. You will then need to flush the inside of the casing with cold running water for about two minutes to make sure the inside is clean. This is accomplished by placing one end of the casing over the end of your stuffing horn and running water into the funnel. I will typically flush each casing for a little over a minute.
You will probably only need about four stands of casing for five pounds of sausage.

Once the casings have been untangled and rinsed inside and out they are ready for use. When you are done making sausage you can dry off any unused casings, put them back into their container and pack with kosher salt. You can store these in the refrigerator until your next batch of sausage.
The case for collagen casings over natural casings is that they are much simpler to use.
Open the bag of collagen casings, slip one on your stuffing horn and start stuffing. No rinsing, no detangling. It is also much easier to find collagen casings as they are often sold in the meat processing section of most sporting goods stores. A final plus for collagen casings is that they are predictable and uniform.
Despite their great convenience there are three disadvantages of collagen casings that keep me from using them. I don’t like collagen casings because I want to have curved sausages. Go ahead and picture a bunch of sausages hanging up at a meat market. They have a slight curve to them don’t they! If you pictured a rope of Polish sausage you may have even imagined a “closed horseshoe”. That curve is something you can only get from a natural casing. Sausages made with a collagen casing are straight as an arrow and to me that just doesn’t look right.
Lesser reasons why I am not a fan of collagen is that while collagen casings are edible, they don’t give that little “snap” when you bite into them like natural casings do. Lastly, I found that when I used collagen casings I had to use twine to tie my links. With a natural casing you can make links simply by twisting the casing. I found that the twists simply wouldn’t hold for collagen casings.
In summary, collagen casings are often much more convenient than natural casings. But, while you should use whatever feels right for you, I plan on sticking with natural casings.
Stuffing the Sausage
Good news…this is much easier than it sounds and looks! The three biggest tips I can offer are:
- Use liquids in your meat paste.
- Keep things cold and move quickly.
- Don’t stress out about pretty links.
Stuffing sausages can be as easy or as hard as you want it to be. You can do this with a plastic funnel and a wooden spoon or you can spend a few hundred dollars on a top of the line stuffer.
Personally I use a three pound stuffing horn that a friend gave me several years ago. It would cost about $50 brand new. Some people despise this type of stuffer as the meat will sometimes the meat will squeeze back past the plunger.

If possible, pre-chill your stuffer in the freezer for thirty minutes or so. If this isn’t possible then dump some ice cubes into the body of the stuffer to help cool it off (remove the ice prior to stuffing though). Regardless of the equipment you are using the basic steps are the same.
- Place the nozzle on your stuffer.
- Push the casing onto the stuffing horn (nozzle, funnel, etc).
- Add the meat to the body of the stuffer and push the meat into the nozzle.
- Tie off the end of the casing.
- Gently keep pushing the meat into the casing.
- Form the sausages as you go into links, ropes or spirals.
You will need a sterile pin when you are stuffing. It is inevitable that some air pockets will form in the some links and you will use the pin to prick the sausage and release the air.

To make links gently pinch the sausage at the desired length then twist it clockwise two or three times.
For the next link you will need to twist the sausage counter clockwise to keep the first link from unraveling. Repeat the cycle always making sure that consecutive links are twisted in opposite directions.


It will be hard to figure out if you are stuffing enough meat into the casings. If you severely overstuff the casings they will burst while you are pushing the meat into them. If you mildly overstuff the casings they will burst when you try to form links. If you under stuff the casings your sausage will not look pretty.
I wish I could be there with you on your first attempt but sadly I cannot. My best guidance is that you have a pretty good idea what these guys are supposed to look like; trust your instincts. If you really mess up; relax, were just making sausage here! Learn from your mistakes and keep going! After a few attempts you will get the hang of this!
Learning to make pretty, uniform links does take some practice. If you get frustrated just tie each link off when it gets to the length you want. My favorite way of stuffing is making small horseshoes and manually tying the two ends together. This isn’t a particularly efficient use of casings but I think the presentation of the final product is amazing.

You can skip the whole linking process entirely and form your sausage into a large spiral. How cool is that? Imagine throwing that guy on the grill at a tailgate party! It is a little challenging cooking a whole spiral of sausage on a grill but it can be done! Whole spirals are easy to cook on a cookie sheet in the oven.

Once the sausages are stuffed you will need to cook them within a few days or vacuum seal and freeze for later use.
Here is a quick YouTube videos of a guy forming links. Sometimes it is easier to learn by watching than reading.
The Role of Nitrites
Nitrites are a controversial and misunderstood ingredient when it comes to sausages. Nitrites get introduced into sausages in the form of curing salts such as Morton Tender Quick or other products sold under the trade names of Cure#1 or Prague Powder #1.
There is much disagreement over whether nitrites are bad for your health. What is certain is that, like anything else, too much will hurt you.
Many “organic” sausage makers will play on this fear and will not add curing salts. Instead they will add naturally occurring nitrite from vegetable extracts (celery, spinach) and produce sausage that actually has a higher nitrite content found in sausages made with curing salts. Nitrite is nitrite; it really doesn’t matter where it comes from.
Nitrites perform two functions in a sausage formulation: they inhibit botulism and they add a distinctive color to the meat. Let’s look at each function individually.
Protection from botulism: The organisms that cause botulism absolutely thrive in a sausage type environment. Inside a sausage you have low oxygen, high moisture and plenty of nutrients. This is a classic botulism day spa! If the temperature of the sausage stays within the temperature zone of 40F to 140F for an appreciable amount of time (over several hours) these nasty critters can grow at an exponential rate. The presence of nitrites greatly inhibits the growth of the botulism producing bacteria and helps make sure sausage is safe to eat.
Is this important for the sausages we are making? Absolutely not.
The extra protection against botulism provided by nitrites will not be needed for our sausages for three reasons. The first is that we thoroughly cleaned our knives, cutting boards, meat grinder, stuffer and hands; we did not contaminate our meat. The second is that we kept our extremely clean meat very cold; we stayed away from the danger zone. The third is that we are either going to cook these sausages immediately or freeze them for later use.
When would nitrites be needed?
Nitrites are ABSOLUTLEY CRITICAL if you are making dry cured sausages like salami or pepperoni. These are sausages that need to hang at room temperature for weeks at a time. Nitrites are also an extremely good idea if you want to make truly traditional smoked sausages where the smoking takes place over the course of four to twenty four hours.
Addition of color: A side effect of the addition of curing salts is that the nitrite turns the meat a very attractive pinkish red. Have you ever seen the perfect “smoke ring” on a smoked brisket? The smoke ring is the result of nitrites from the smoke interacting with the proteins in the meat. If you wanted to get the “ultimate” smoke ring you would have to find a way to get the nitrite all the way through the meat. That is exactly what you get when you make corned beef. A sausage without nitrite will be a dullish gray in color after cooking while one containing nitrite will be a rosy pink.
Earlier, when we were preparing our meat I performed an extra step that I didn’t talk about then because I didn’t want folks to get confused. I split the cubed and seasoned meat into two batches. I added a little less than ½ teaspoon of Cure #1 to one of the batches but not to the other.

I ground and stuffed the batches of meat separately and let the sausages sit overnight in the refrigerator so the nitrite would have time to interact with the sausage.
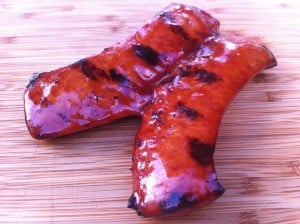
The next day I cooked a sausage from each batch in the oven together and got the following results. The sausage with nitrite in the reddish pink one on the bottom.

Pretty cool! Which of the two sausages look more appetizing to you?
I am convinced that the nitrite containing sausage also tastes slightly different. I think it is a little juicier and more “porky”. That being said it could all be in my head; I have a hard time believing that such a small change in seasoning could impact the flavor at a noticeable level.
It might be that I think it looks better so I also think it tastes better.

This is another excellent reason to make your own sausage. If you want the color and flavor added by nitrites go ahead and use some. If you hate the idea of nitrites in your food now you can eliminate them. It’s completely within your control.
The maximum amount of nitrite legally allowed in sausages is 200 parts per million (ppm). Here is how the math works out for a five pound batch of sausage:
- 5 lbs = (5 lb) x (453 grams/lb) = 2265 grams of meat
- 200 ppm = [ (X grams nitrite) x (1,000,000)] / 2265 grams of meat
- X = 0.45 grams of nitrite
If you decide to add curing salts to your sausages then you need to understand that all curing salts are not equal.
Cure #1, also known as pink salt, contains 6.25% nitrite by weight. The remaining 93.75% is salt. A commercial producer would be legally allowed to use up to 7 grams of Cure #1 for a 5 lb batch of sausage. Seven grams of Cure #1 is roughly equivalent to one heaping teaspoon.
Morton Tender Quick contains 0.5% nitrite and 0.5% nitrate by weight. The remaining 99% is a mixture of salt and sugar. A commercial producer would be legally allowed to use up to 45 grams of Tender Quick for a 5 lb batch of sausage. Forty five grams of Tender Quick is about 3 level tablespoons.
You do not need to use the maximum legal amount of nitrite to get the desired curing effect. You also need to remember that if you are using Tender Quick for a five pound batch of sausage then you are adding about 44 grams of salt and sugar so your base recipe should be adjusted accordingly.
I try to keep thing simple. I use just under a teaspoon of Cure#1 per 5 lbs of sausage.
Do NOT CONFUSE THE PRODUCTS. If you add 3 tablespoons of Cure #1 the meat in unsafe for consumption and MUST BE DISCARDED.
Sausage that has had a curing agent added should not be cooked immediately. Let the sausage rest in the refrigerator overnight to make sure the cure has had time to interact with all of the meat.
The Basic Recipe
This part is a LOT easier if you have a kitchen scale that reads in grams. The basic recipe for sausage is
- 1 part meat and fat
- 2.5% salt
- 1% other stuff
- Up to 10% liquid
So how do you take this and actually use it? This is where having weights available in grams is very handy (if you don’t have a scale keep reading, estimates are given below). One pound equals 453 grams. This means your five pounds of cubed meat and fat will weigh about 2265 grams.
- Multiply 2265 grams by 2.5% and you see that you need 56 grams of salt (about 3.5 tablespoons).
- Multiply 2265 grams by 1% and you see that you need 22 grams of “other stuff” (about 1.5 tablespoons).
- Multiply 2265 grams by 10% and you see that you can use up to 226 grams of liquid (about one cup).
The “other stuff” will define your sausage. These are things like black pepper, paprika, garlic, sage, onion and chili powder.
The liquid portion can be anything wet (water, wine, stock, milk) and serves four purposes. (1) It adds moisture to the meat resulting in a juicier sausage. (2) It lubricates the meat making stuffing much easier. (3) It adds flavor to the sausage if you choose to use wine or stock. (4) It helps disperse the other seasonings throughout the rest of the sausage. Make sure any liquid is ice cold before adding to the meat.
Using this framework we can develop a pretty tasty recipe as follows:
- 5 lbs of meat and fat (1 pork butt)
- 3.5 tablespoons of salt
- ½ tablespoon garlic powder
- ½ tablespoon black pepper
- ½ tablespoon chili powder
- 1 cup ice water
I want to add a quick note about using garlic in these recipes. I really like using fresh garlic over powdered or granulated. When using fresh garlic you have to remember that it is mostly water and the basic recipe above must be adjusted. One tablespoon of granulated garlic is equivalent to four tablespoons of fresh garlic.
In my first attempts at making sausage I refused to add a liquid component. I was under the impression that adding water was a nefarious technique commercial sausage makers used to lower their cost per pound.
I can’t describe how incredibly hard it was to push these sausages through my stuffer. My arm was sore for two days and I hated the thought of making sausage. Once I started adding water in my recipes I wanted to kick myself for being so stubborn! Well lubricated meat will glide through your stuffer and is a joy to work with!
Once you get comfortable with the basic technique and proportions feel free to play around and create your own signature sausage. As you will see with the last recipe I offer, once you get the basic technique down you can take all of the rules and throw them out the window.
Homemade Pork Sausage
Ingredients
- 5 lbs pork butt (meat and fat)
- 3.5 tbsp salt
- 1/2 tbsp granulated garlic
- 1/2 tbsp black pepper
- 1/2 tbsp chili powder
- 1 cup ice cold water
Instructions
- Cut the pork butt into 1-2 inch cubes.
- Run the cubed pork butt through a meat grinder.
- Add all of the remaining ingredients to the ground pork and mix well to combine.
- Test fry a small amount of the sausage, taste and adjust the seasoning of the ground meat if needed.
- Stuff the sausage into natural hog casings and twist off every 6 inches to make links.
- Allow the stuffed sausages to rest in the refrigerator for one hour before cooking to let the flavors meld.
Notes
In the recipes that follow I make no claim that they are “authentic” or “authoritative”. These are recipes that are pretty close to what most of us would recognize as being indicative of the style. There are hundreds of variations on each of the following sausages.
My recipes are not the best. The best recipes are the ones that you will come up with and that you prefer to make. My recipes are only a guide.
American Breakfast Sausage
I have included this as the first recipe for a few reasons. This is the first type of sausage that many of us ever experienced so it just makes since to learn how to make this one first. Secondly, this is a sausage that is typically stored in bulk and formed into patties prior to cooking. This lets you get some experience with making sausage without worrying about a stuffer and casings.
- 1 Boston butt, about 5 lbs.
- 3.5 tablespoons salt
- 1 tablespoon black pepper
- ½ tablespoon dried sage
- ½ cup ice water
Trim the pork and cut into cubes. Combine the pork with the seasonings and place the mixture in the refrigerator for an hour. Run the mixture through your grinder then mix with the ice water until a paste is formed.
Test fry a portion of the sausage and adjust the seasoning as desired. Some folks like it a little hotter and add either more black pepper or a little cayenne. I have always liked a bit of garlic in this mix.
Divide the sausage into one pound portions and form into logs. You can make your logs pretty by first roughly forming and then placing them on a sheet of plastic wrap. Roll the plastic wrap around the log then grab the ends of the wrap and gently spin the sausage causing the plastic to twist. This will compress the sausage into a more uniform shape.
I will leave the sausage in the plastic wrap until I am ready to make patties. Vacuum seal and freeze any sausage that will not be cooked within a week.
Italian Sausage
This sausage has two classic variations and is a great example of using the liquid component as a flavoring agent.
Spicy Italian Sausage
- 5 lbs pork butt
- 3 tablespoons salt
- 2 tablespoons minced garlic
- 1 tablespoon dried parsley
- 1 tablespoon black pepper
- 1 teaspoon dried oregano
- 1 teaspoon dried thyme
- 1 teaspoon red pepper flakes
- 1 teaspoon Cure #1 (optional)
- ½ cup red wine
- ½ cup ice water
Sweet Italian Sausage
- 5 lbs pork butt
- 3 tablespoons salt
- 2 tablespoons minced garlic
- 1 tablespoon dried parsley
- 1 tablespoon sugar
- ½ tablespoon black pepper
- 2 teaspoons fennel seed
- 1 teaspoon Cure #1 (optional)
- ½ cup red wine
- ½ cup ice water
Trim and cube the pork into one to two inches pieces and mix with the other seasonings except for the water and wine. After the mixture has chilled in the refrigerator or freezer grind it into a metal bowl and add the ice cold red wine. Mix the wine into the ground meat adding just as much of the water as needed to form a paste. Once the mixture has chilled again it is ready for stuffing into casings.
This sausage is also good stored in bulk for use as a pizza topping or in lasagna, etc.
Polish Sausage
This sausage is defined by garlic and marjoram. This style of sausage referred to as both Polish sausage and Kielbasa. I use the roasted minced garlic you can find in jars in the produce section for this sausage. I would not use dried or granulated. When the theme of the sausage is garlic use the good stuff.
- 5 lbs Boston butt
- 3.5 tablespoons salt
- 4 tablespoons minced garlic
- 1 tablespoon dried marjoram
- 1/2 tablespoon black pepper
- 1 teaspoon Cure #1 (optional)
- 1 cup ice water
Trim the pork and cut into one to two inch cubes. Mix the pork with the remaining ingredients (except water) and allow it to chill in the refrigerator or freezer.
Grind the seasoned pork into a metal bowl and add the ice water a quarter cup at a time while mixing until a smooth paste is obtained. Stuff the sausage into casings. Allow the sausage to rest in the refrigerator overnight if Cure #1 was used to allow the nitrite time to interact with the meat.
I strongly suspect that the use of curing salts is traditional with this sausage but cannot say with certainty. This is a type of sausage that was often slow smoked so in those cases the cure would have been used. I suspect the cure would have been retained for the fresh sausage like we are making.
Andouille
I have seen many recipes for andouille and while living in Louisiana have tasted many versions. The two constants among all of them is the texture of the sausage and the strong flavor profile. You will note that the recipes deviates strongly from the “Basic Sausage Recipe” I gave earlier which results in an extremely intensely flavored sausage. This sausage is typically used as a component in another dish such as gumbo or jambalaya. There is nothing wrong with eating this sausage by itself but most folks don’t.
- 5 lbs of Boston butt
- 3.5 tablespoons salt
- 3 tablespoons minced garlic
- 2 tablespoons smoked paprika (Use the good stuff that actually has flavor.)
- 2 tablespoons black pepper
- 1 tablespoon ground thyme
- 1 teaspoon cayenne
- 1 teaspoon Cure #1 (optional)
- 1 cup ice water
This is a sausage where you do a little extra knife work to get some impressive results. The key to this sausage is that you do not grind all of the meat. Retain about a quarter of the cubed pork and keep it in the freezer while you grind the rest. Place the ground meat into the freeze and remove the cubed meat. Dice the cubed meat into small pieces between a quarter and half inch in size; they do not need to be uniform.
Add the diced meat to the ground meat then add your liquid and mix to evenly incorporate and stuff as normal.
The contrasting texture of the resulting sausage is beautiful. I will always use Cure #1 with this sausage as I think it makes the sausage even prettier. If you use nitrite make sure the sausage rests in the refrigerator overnight before cooking.
Boudin
I include this sausage because it is delicious and a real mind opener as to how far the boundaries of sausage making can be stretched. Boudin is a true regional sausage of southern Louisiana and has cooked rice as a primary ingredient. I love this sausage because it just makes sense for this rice growing region of the country.

Place one pound of pork (butt, country style ribs, etc) in a pan and cover with three cups of water. Add a quartered onion, a stalk of celery, and a few cloves of garlic. Season the water with a little salt and pepper and simmer the pork until it is cooked through, about 45 minutes.
Remove the pork from the water and cut into rough cubes. Strain and reserve the water used when cooking the pork.
Next cook a pot of long grained rice. Combine two cups of water with two cups of the reserved cooking liquid and bring to a boil. Add two cups of long grained rice and simmer for 20-30 minutes until the rice is done.
Take your cubed pork and a quarter cup of green onions and run them through your meat grinder. Add the ground pork to the cooked rice and season the mixture with salt and pepper until it meets your satisfaction. You can spice this stuff up with some chili powder of cayenne and that would be pretty good too. Add a quarter cup of chopped parsley for some nice color.
At this point the mixture ought to taste great but will be too dry for easy stuffing. Add some more of the reserved cooking liquid to the rice mix until it becomes wet enough to easily go through your stuffer.
At this point you can load the mix into your stuffer and stuff into casings as usual.
Traditionally this sausage is made with a mixture of pork butt and liver. However, I am not a fan of liver and since I can make my sausage any way I want to I choose to not use it.
Boudin can be cooked in many different ways but all you really need to do is make sure the casing gets cooked and the rice mixture gets warmed.
Traditionally the sausage is steamed but I think it is even better when smoked. Boudin is an excellent addition to any breakfast.
More Sausage Resources
Here are a couple other resources for you to explore if you want to continue on your sausage making adventure.
Sausage Making Supplies
My handy, dandy list of stuff you need to get started.
Knackwurst: What Is it And How to Make
Bockwurst: What Is It and How to Make
Bratwurst: What Is It and How to Make
Bauernwurst: What is It and How to Make
How to Make a Bacon Cheeseburger Sausage
Soppressata: Toscana vs di Calabria
Mortadella: What is It and How to Make
Wedliny Domowe
Great general reference site about sausages. Worth reading.
Sausage Making Forum
This a real friendly bunch of folks who are ready with plenty of advice, recipes and tips.


Looking forward to reading your info. Thanks
Tom,
Thanks for stopping by. If there is anything that is not clear please let me know. I hope you find my site useful.
Regards,
David
Do you happen to have recipe for the type of smoked sausage that you find in any number of BBQ joints in around Central and Eastern Texas? I believe many call them Texas hot links and I’m fairly certain the contain a mix of beef and pork on a course grind. I’ve been thinking of trying to make some of them.
Rick, I do not have my own recipe. I do have two recipes from Paul Kirk’s Championship Barbecue that I can e-mail you. I have not tried making either sausage myself.
David first off, thanks for taking the time to post your e-book. I found it very helpful.
I to would like the recipes for the hot links. Been wanting to make some. Have been busy curing bacon and smoking with hickory. Now its sausage time. Thanks again. Bill
Bill,
You are very welcome. Check your e-mail for the hot links. I would love to know how they turn out.
Really inspired to have a go at making sausages now, just took delivery of my first smoker, a Weber Smokey Mountain, very excited to get started and experiment.
Thanks for sharing the info.
Regards
Stewart
Stewart,
Congratulation on the WSM and welcome aboard! You are going to love the WSM and have a blast making sausage. Thanks for dropping by!
Bookmarked… i will be back for sure. one of the best write ups on sausage making ive seen.
Thank you sir!! There is more good stuff in the ebook!!
Thank you, David!! I have been wanting to make my own sausage for some time, and now, I have the courage to do it!
I really appreciate your attention to detail in walking through each step.
I’m going to purchase a hand grinder and hand stuffer from LEM.
I can’t wait to get started!
Scott, Very welcome!
Welcome to the party!